Accelerated KVM guests on WSL 2
The internet asked for this.

This guide has been deprecated in favor of this 2022 update.
Requirements
Windows 10 Insider Fast Ring, tested on build 19645.1
Ubuntu 20.04 on WSL 2
An Intel Core i5+ CPU*
An X server for Windows, e.g. X410 or VcXsrv (For now, native GUI support and GPU acceleration is coming!)
At least 16GB RAM
At least 40GB free hard drive space
*AMD users: WSL 2 runs in a lightweight Hyper-V platform on any edition of Windows 10. Hyper-V just got AMD nested virtualization support. They have said Linux KVM guest support is coming.
Recommended
Familiarity with building a Linux kernel**
Familiarity with KVM, QEMU, or virtualization technology
Windows Terminal (Get it. It's fast!)
**If you are not ready to build Linux kernel modules but want to get started, check out my guide on running Windows 2000 with QEMU on WSL.
Update, upgrade, and install dependencies
You have been regularly updating your WSL distro, right?
sudo apt update && sudo apt -y upgrade
sudo apt -y install build-essential libncurses-dev bison flex libssl-dev libelf-dev cpu-checker qemu-kvm aria2
Get kernel sources
You need a kernel. You could use any kernel, including one from your distro, but for simplicity I use the default Microsoft WSL terminal as a base.
There may be more recent WSL 2 kernels available but this has only been tested on 4.19.104 (and you will need 4.19.121 or higher for GPU compute):
cd ~
aria2c -x 10 https://github.com/microsoft/WSL2-Linux-Kernel/archive/4.19.104-microsoft-standard.tar.gz
tar -xf WSL2-Linux-Kernel-4.19.104-microsoft-standard.tar.gz
cd WSL2-Linux-Kernel-4.19.104-microsoft-standard/
If you are reading this in the future, you can check your current WSL 2 version number with:
uname -rYou can find all the WSL 2 kernel releases on GitHub.
You could also use git to retrieve specific branches and tagged releases of the WSL 2 kernel.
Optimize kernel config for KVM on WSL
Start by borrowing the official WSL 2 kernel configuration:
cp Microsoft/config-wsl .configThen let's customize it:
make menuconfigUnder Virtualization I set KVM for Intel processor support to build as a module (read below and decide if you should) and enable built-in virtio net support:
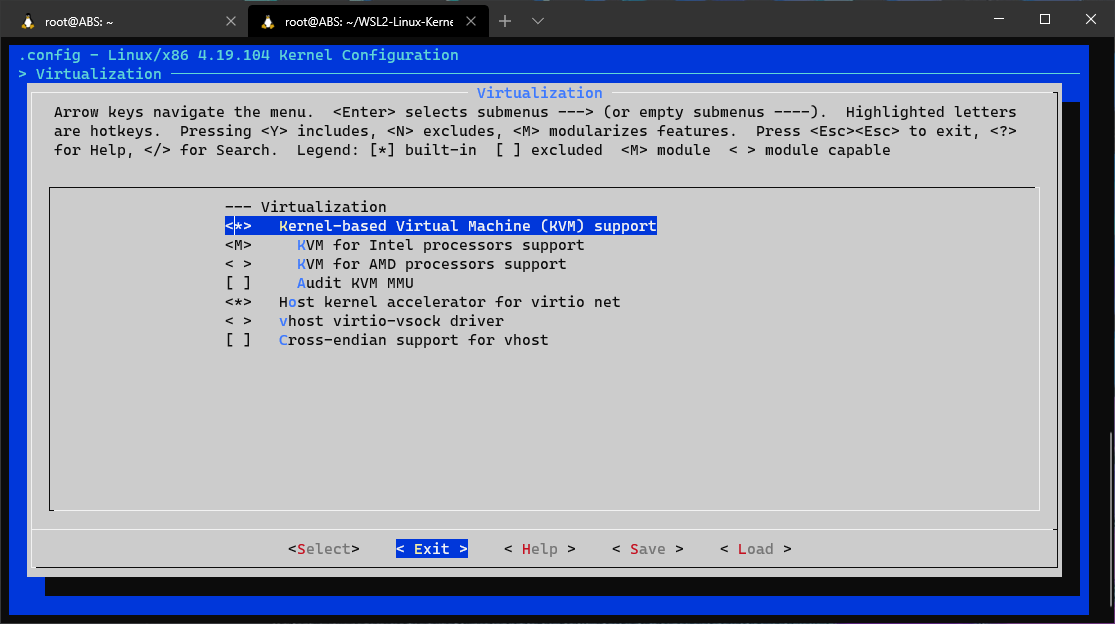
Important note about building a module in WSL:
Building KVM for Intel as a module <M> makes it easier to unload, tweak, and reload the module as needed, for example:
sudo modprobe -r kvm_intel # removes the module

modprobe kvm_intel enable_apicv=0 # reloads the module with apicv disable
This might be useful getting certain operating systems to run or finetune their performance. But it means you will have to load the module each time manually or add it to your .bashrc.
If you don't want to do this, just leave KVM for Intel processors support as built-in <*>, and you can skip the make modules_install step below, but make sure you still add KVM guest support and configure kvm_intel in /etc/modprobe.d/kvm-nested.conf as described below.
Exit the Virtualization menu and then proceed to Processor type and features -> Linux guest support enable built-in KVM guest support:
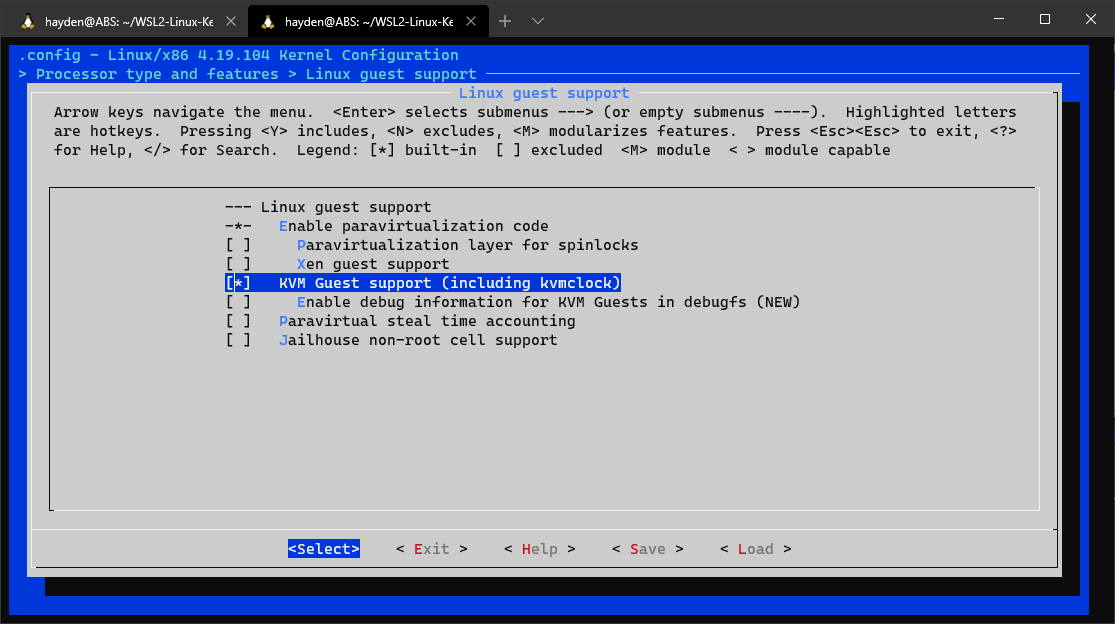
Exit and save as .config.
Flags
If you are 10x and too cool to use a GUI, you can edit your .config directly in vim:
KVM_GUEST=y
CONFIG_KVM=y
CONFIG_KVM_INTEL=m
CONFIG_VHOST_NET=y
CONFIG_VHOST=y
Build the new kernel
make -j 8Sit back and watch a movie while you wait:
Install your kernel modules
sudo make modules_installInstall your kernel in WSL 2 and enable nested KVM
cp arch/x86/boot/bzImage /mnt/c/Users/<username>/bzImage
nano /mnt/c/Users/<username>/.wslconfig
Paste but don't forget to change <username> to your Windows username:
[wsl2]
nestedVirtualization=true
kernel=C:\\Users\\<username>\\bzImage
WSL 2 Settings Pro Tip
- /etc/wsl.conf manages your distro-specific WSL settings
- %HOMEPATH%\.wslconfig manages for global WSL settings
Reboot WSL 2
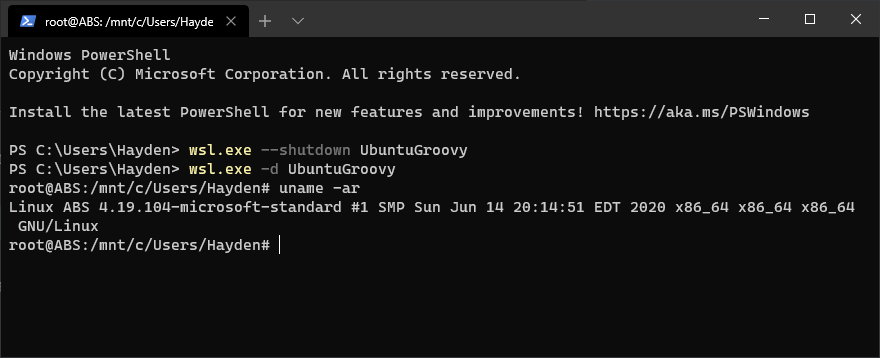
Close all open WSL instances. If you are using Windows Terminal just open a PowerShell terminal tab and close the other tabs. See, I told you to get Windows Terminal.
In a new PowerShell terminal:
wsl.exe --shutdown Ubuntu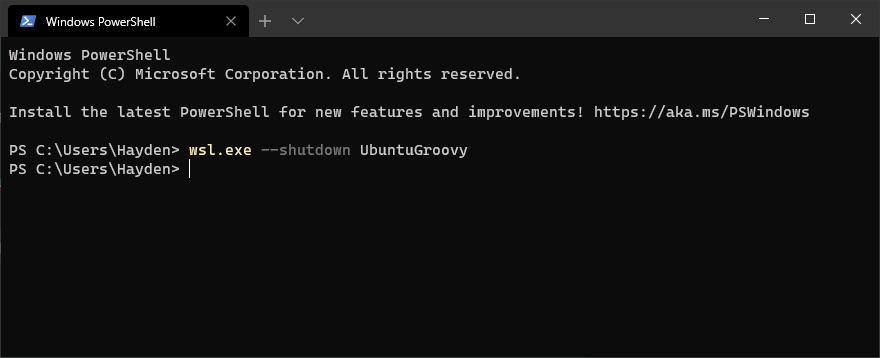
Re-open Ubuntu on WSL:
wsl.exe -d Ubuntu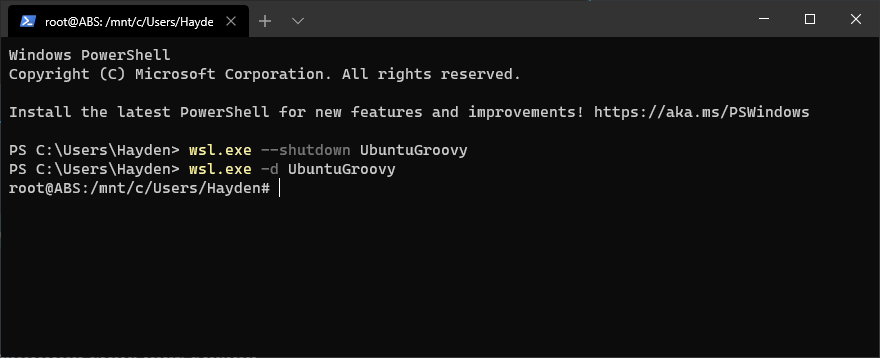
Check you are running your new kernel
uname -arshould show today's date and the time should be a few minutes ago.
Configure kvm-intel
nano /etc/modprobe.d/kvm-nested.confPaste:
options kvm-intel nested=1
options kvm-intel enable_shadow_vmcs=1
options kvm-intel enable_apicv=1
options kvm-intel ept=1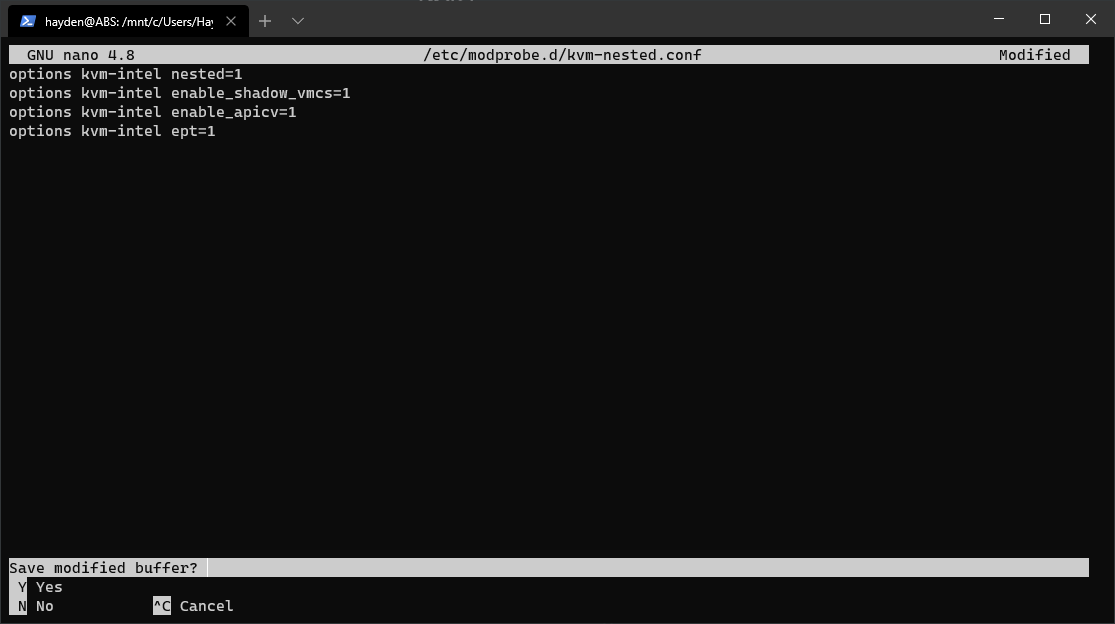
Load kernel module
sudo modprobe kvm_intelTest KVM with:
kvm-ok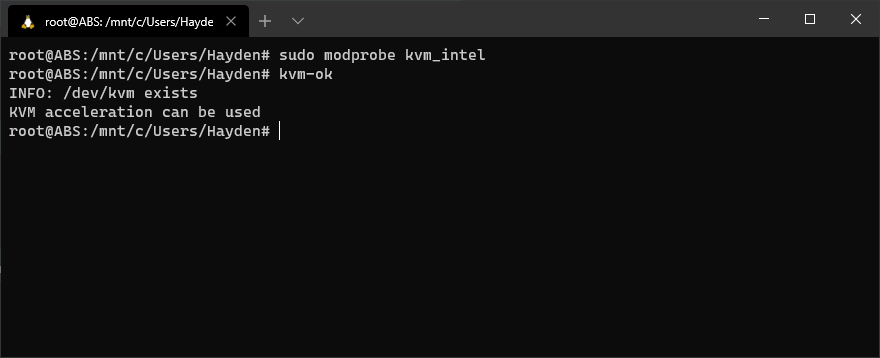
Check for nested KVM with:
cat /sys/module/kvm_intel/parameters/nestedshould report "Y"

Configure X for WSL 2
Install X410 or VcXsrv and configure firewall settings to allow on Public network. I prefer X410 because it does it for you, but it costs about $10 USD in the Store. VcXsrc is free and open source but requires a bit more manual configuration Native GUI support is coming, more details later in 2020.
Once you are running X on Windows, redirect your WSL X output to Windows by setting the DISPLAY environmental variable:
export DISPLAY=$(cat /etc/resolv.conf | grep nameserver | awk '{print $2; exit;}'):0.0You can add this command to ~/.bashrc to run every time you open Ubuntu WSL:
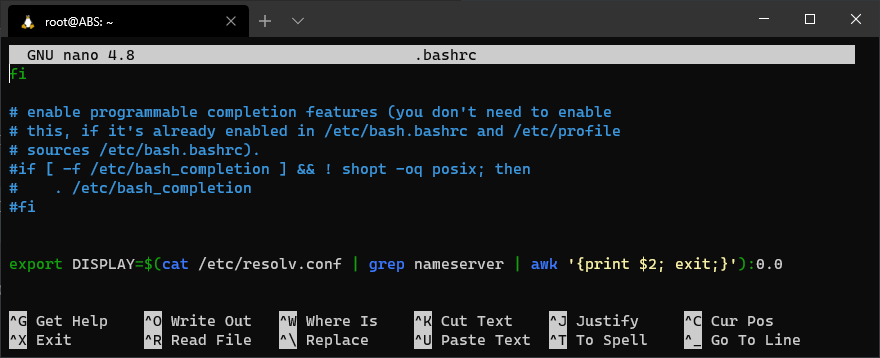
If you add this command to your .bashrc file, then to load it for this session just:
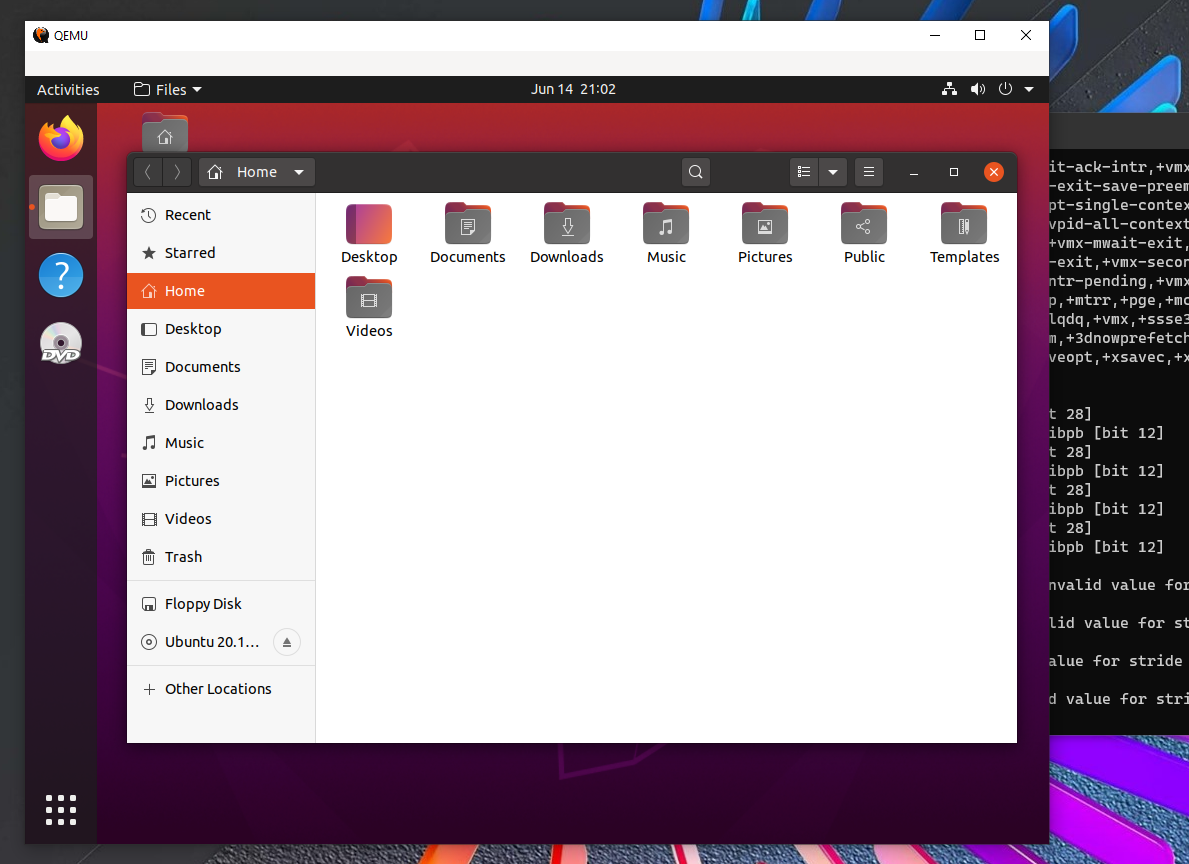
source ~/.bashrcDownload an Ubuntu desktop install ISO
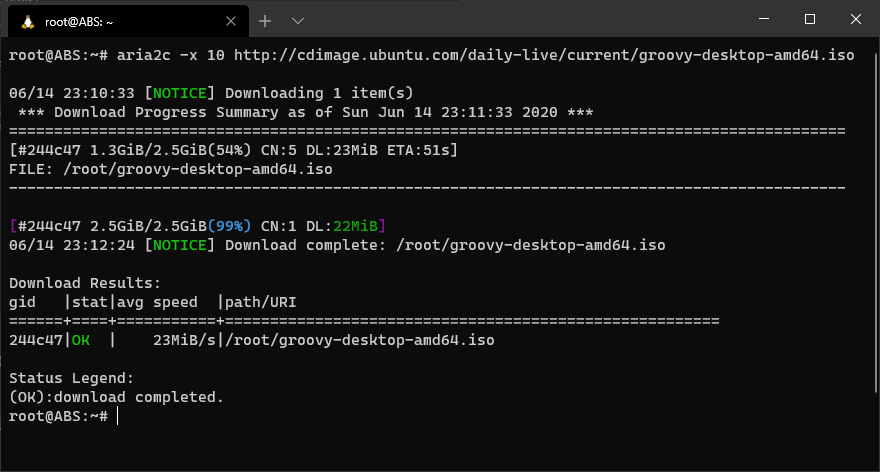
Go back to your home folder, or make a folder inside WSL to keep this project (NOT on /mnt/c/ it will slow you down), and then download the nightly Ubuntu desktop install ISO with aria2:
cd ~
aria2c -x 10 http://cdimage.ubuntu.com/daily-live/current/groovy-desktop-amd64.iso
You can ISOs for Ubuntu 20.04 LTS (focal) and many of the official flavors here.
aria2
aria2 is a next generation download utility.
Use aria2c in place of wget for all your downloads, add -x 10 to break the download up into 10 download threads, it speeds things up quite a bit.
Create a qcow2 virtual hard drive for QEMU
This will be our virtual hard drive for our Ubuntu . qcow2 is the default virtual hard drive container for QEMU, similar to .vhd, .vdi, .vmdk files.
qemu-img create -f qcow2 ubuntu.qcow2 15G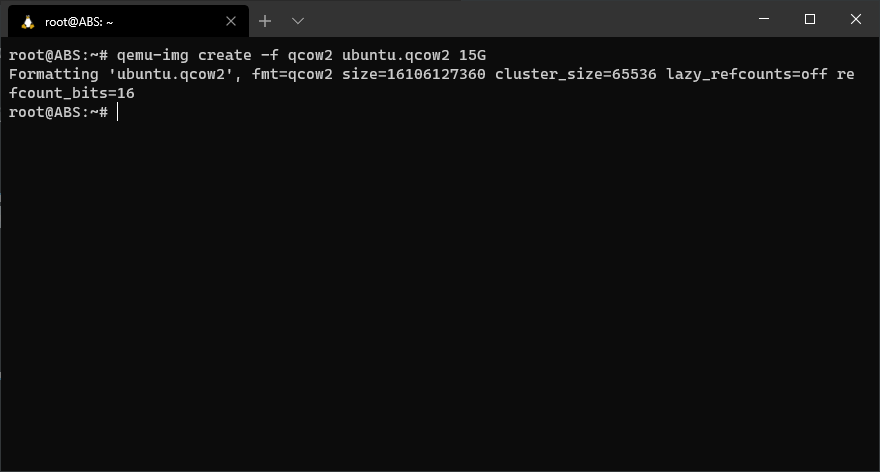
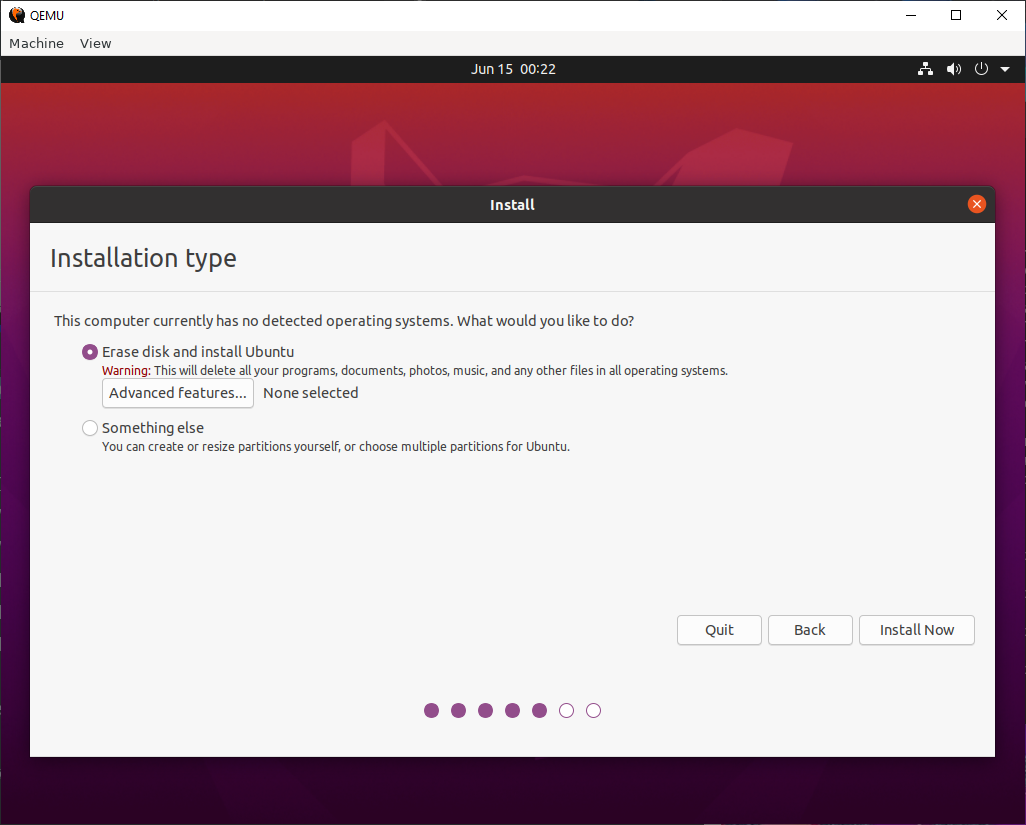
The Ubuntu installer will detect the virtual drive, partition, install, and install a bootloader. If you are installing another distro or operating system you may need to manually format and partition as part of the install process.
Boot from the ISO and install to the virtual hard drive
qemu-system-x86_64 \
	-drive file=ubuntu.qcow2,format=qcow2 \
	-drive file=groovy-desktop-amd64.iso,media=cdrom,readonly \
	-net nic -net user \
	-m 5172 \
	-vga qxl \
	--enable-kvm \
	-smp 4 \
	-cpu kvm64,+vmx,+vme,+msr,+x2apic,+hypervisor,+aes,+vmx-activity-hlt,+vmx-cr3-load-noexit,+vmx-cr3-store-noexit,+vmx-cr8-load-exit,+vmx-cr8-store-exit,+vmx-desc-exit,+vmx-entry-ia32e-mode,+vmx-entry-load-efer,+vmx-entry-load-pat,+vmx-entry-noload-debugctl,+vmx-ept,+vmx-ept-1gb,+vmx-ept-2mb,+vmx-ept-execonly,+vmx-eptad,+vmx-exit-ack-intr,+vmx-exit-load-efer,+vmx-exit-load-pat,+vmx-exit-nosave-debugctl,+vmx-exit-save-efer,+vmx-exit-save-pat,+vmx-exit-save-preemption-timer,+vmx-flexpriority,+vmx-hlt-exit,+vmx-intr-exit,+vmx-invept,+vmx-invept-all-context,+vmx-invept-single-context,+vmx-invept-single-context,+vmx-invept-single-context-noglobals,+vmx-invlpg-exit,+vmx-invvpid,+vmx-invvpid-all-context,+vmx-invvpid-single-addr,+vmx-io-bitmap,+vmx-io-exit,+vmx-monitor-exit,+vmx-movdr-exit,+vmx-msr-bitmap,+vmx-mwait-exit,+vmx-nmi-exit,+vmx-page-walk-4,+vmx-pause-exit,+vmx-pml,+vmx-preemption-timer,+vmx-rdpmc-exit,+vmx-rdtsc-exit,+vmx-secondary-ctls,+vmx-shadow-vmcs,+vmx-store-lma,+vmx-true-ctls,+vmx-tsc-offset,+vmx-unrestricted-guest,+vmx-vintr-pending,+vmx-vmwrite-vmexit-fields,+vmx-vnmi,+vmx-vnmi-pending,+vmx-vpid,+de,+pse,+tsc,+msr,+pae,+mce,+cx8,+apic,+sep,+mtrr,+pge,+mca,+cmov,+pat,+pse36,+clflush,+mmx,+fxsr,+sse,+sse2,+ss,+ht,+syscall,+nx,+pdpe1gb,+rdtscp,+lm,+pni,+pclmulqdq,+vmx,+ssse3,+fma,+cx16,+pcid,+sse4_1,+sse4_2,+movbe,+popcnt,+aes,+xsave,+avx,+f16c,+rdrand,+hypervisor,+lahf_lm,+abm,+3dnowprefetch,+ssbd,+ibpb,+stibp,+fsgsbase,+bmi1,+avx2,+smep,+bmi2,+erms,+invpcid,+rdseed,+adx,+smap,+clflushopt,+xsaveopt,+xsavec,+xgetbv1,+xsaves \
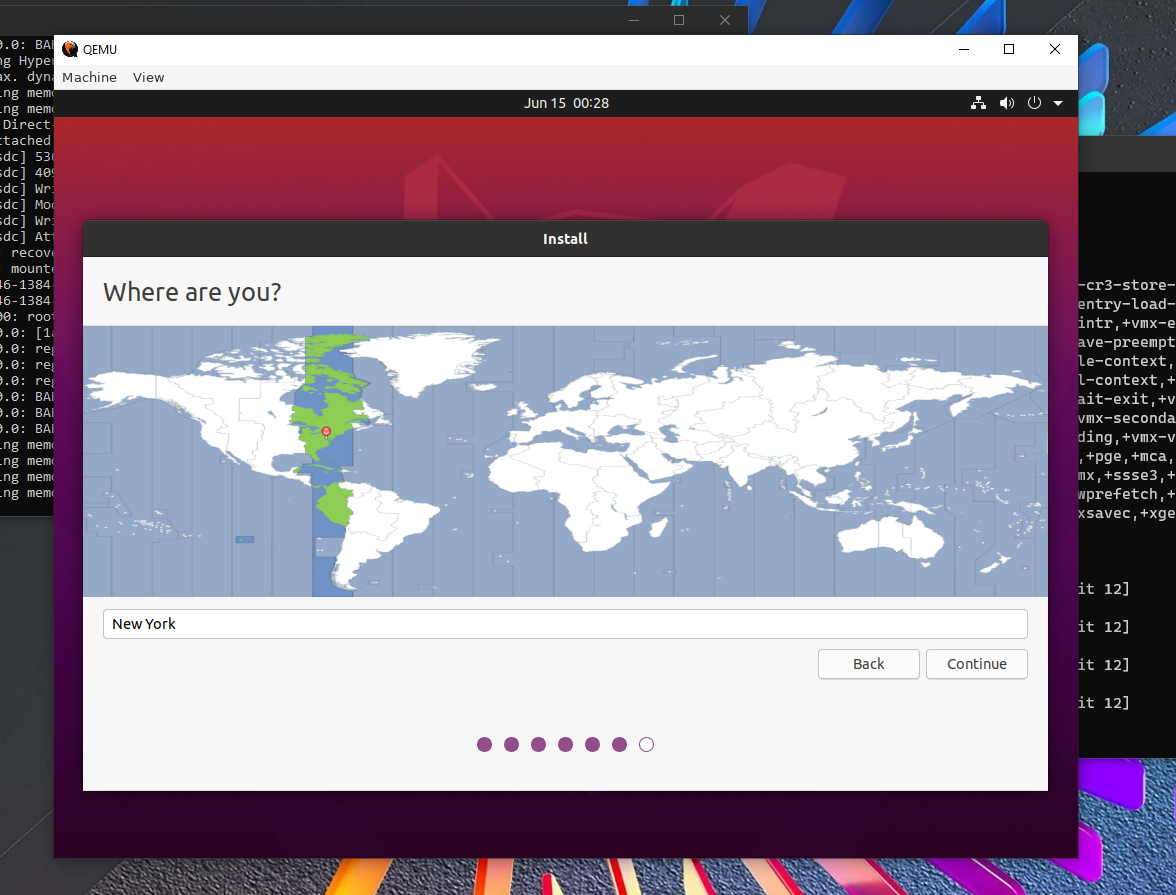
Then follow normal Ubuntu installation steps:
What is all this?
This launches QEMU, an open source system emulator/virtualizer. QEMU is a powerful tool I use often. One of my favorite uses is to emulate vintage hardware to run vintage operating systems. I wrote a guide to run Windows 2000 on WSL using QEMU.
Most of the flags, like mounting the virtual hard drive and ISO as a cdrom, are self explanatory.
For more, check the QEMU manual page:

There are more links to docs on WSL 2, QEMU. and KVM below.
Why such a long CPU line though?
None of the stock CPU types in QEMU matched well with the WSL environment so I started with a basic kvm64 and then added back all of the CPU flags supported in Hyper-V and then tested to see which of the vmx flags worked. VMX extensions are the Intel VT-x extensions to accelerate virtual machines.
After tweaking the kernel and exposing these CPU flags I found significant performance improvements in KVM on Ubuntu WSL and, much to my surprise, the ability to run nested-upon-nested KVM.
Future boots
You can omit the boot ISO line:
drive file=groovy-desktop-arm64.iso,media=cdrom,readonly \after you install Ubuntu to ubuntu.qcow2:
Make a boot script
cd ~
nano boot_ubuntu_kvm.sh
Paste:
#!/bin/bash
qemu-system-x86_64 \
	-drive file=ubuntu.qcow2,format=qcow2 \
	-net nic -net user \
	-m 5172 \
	-vga qxl \
	--enable-kvm \
	-smp 4 \
	-cpu kvm64,+vmx,+vme,+msr,+x2apic,+hypervisor,+aes,+vmx-activity-hlt,+vmx-cr3-load-noexit,+vmx-cr3-store-noexit,+vmx-cr8-load-exit,+vmx-cr8-store-exit,+vmx-desc-exit,+vmx-entry-ia32e-mode,+vmx-entry-load-efer,+vmx-entry-load-pat,+vmx-entry-noload-debugctl,+vmx-ept,+vmx-ept-1gb,+vmx-ept-2mb,+vmx-ept-execonly,+vmx-eptad,+vmx-exit-ack-intr,+vmx-exit-load-efer,+vmx-exit-load-pat,+vmx-exit-nosave-debugctl,+vmx-exit-save-efer,+vmx-exit-save-pat,+vmx-exit-save-preemption-timer,+vmx-flexpriority,+vmx-hlt-exit,+vmx-intr-exit,+vmx-invept,+vmx-invept-all-context,+vmx-invept-single-context,+vmx-invept-single-context,+vmx-invept-single-context-noglobals,+vmx-invlpg-exit,+vmx-invvpid,+vmx-invvpid-all-context,+vmx-invvpid-single-addr,+vmx-io-bitmap,+vmx-io-exit,+vmx-monitor-exit,+vmx-movdr-exit,+vmx-msr-bitmap,+vmx-mwait-exit,+vmx-nmi-exit,+vmx-page-walk-4,+vmx-pause-exit,+vmx-pml,+vmx-preemption-timer,+vmx-rdpmc-exit,+vmx-rdtsc-exit,+vmx-secondary-ctls,+vmx-shadow-vmcs,+vmx-store-lma,+vmx-true-ctls,+vmx-tsc-offset,+vmx-unrestricted-guest,+vmx-vintr-pending,+vmx-vmwrite-vmexit-fields,+vmx-vnmi,+vmx-vnmi-pending,+vmx-vpid,+de,+pse,+tsc,+msr,+pae,+mce,+cx8,+apic,+sep,+mtrr,+pge,+mca,+cmov,+pat,+pse36,+clflush,+mmx,+fxsr,+sse,+sse2,+ss,+ht,+syscall,+nx,+pdpe1gb,+rdtscp,+lm,+pni,+pclmulqdq,+vmx,+ssse3,+fma,+cx16,+pcid,+sse4_1,+sse4_2,+movbe,+popcnt,+aes,+xsave,+avx,+f16c,+rdrand,+hypervisor,+lahf_lm,+abm,+3dnowprefetch,+ssbd,+ibpb,+stibp,+fsgsbase,+bmi1,+avx2,+smep,+bmi2,+erms,+invpcid,+rdseed,+adx,+smap,+clflushopt,+xsaveopt,+xsavec,+xgetbv1,+xsaves \
Exit and save.
Mark the file executable:
sudo chmod u+x boot_ubuntu_kvm.shNow it can be run as:
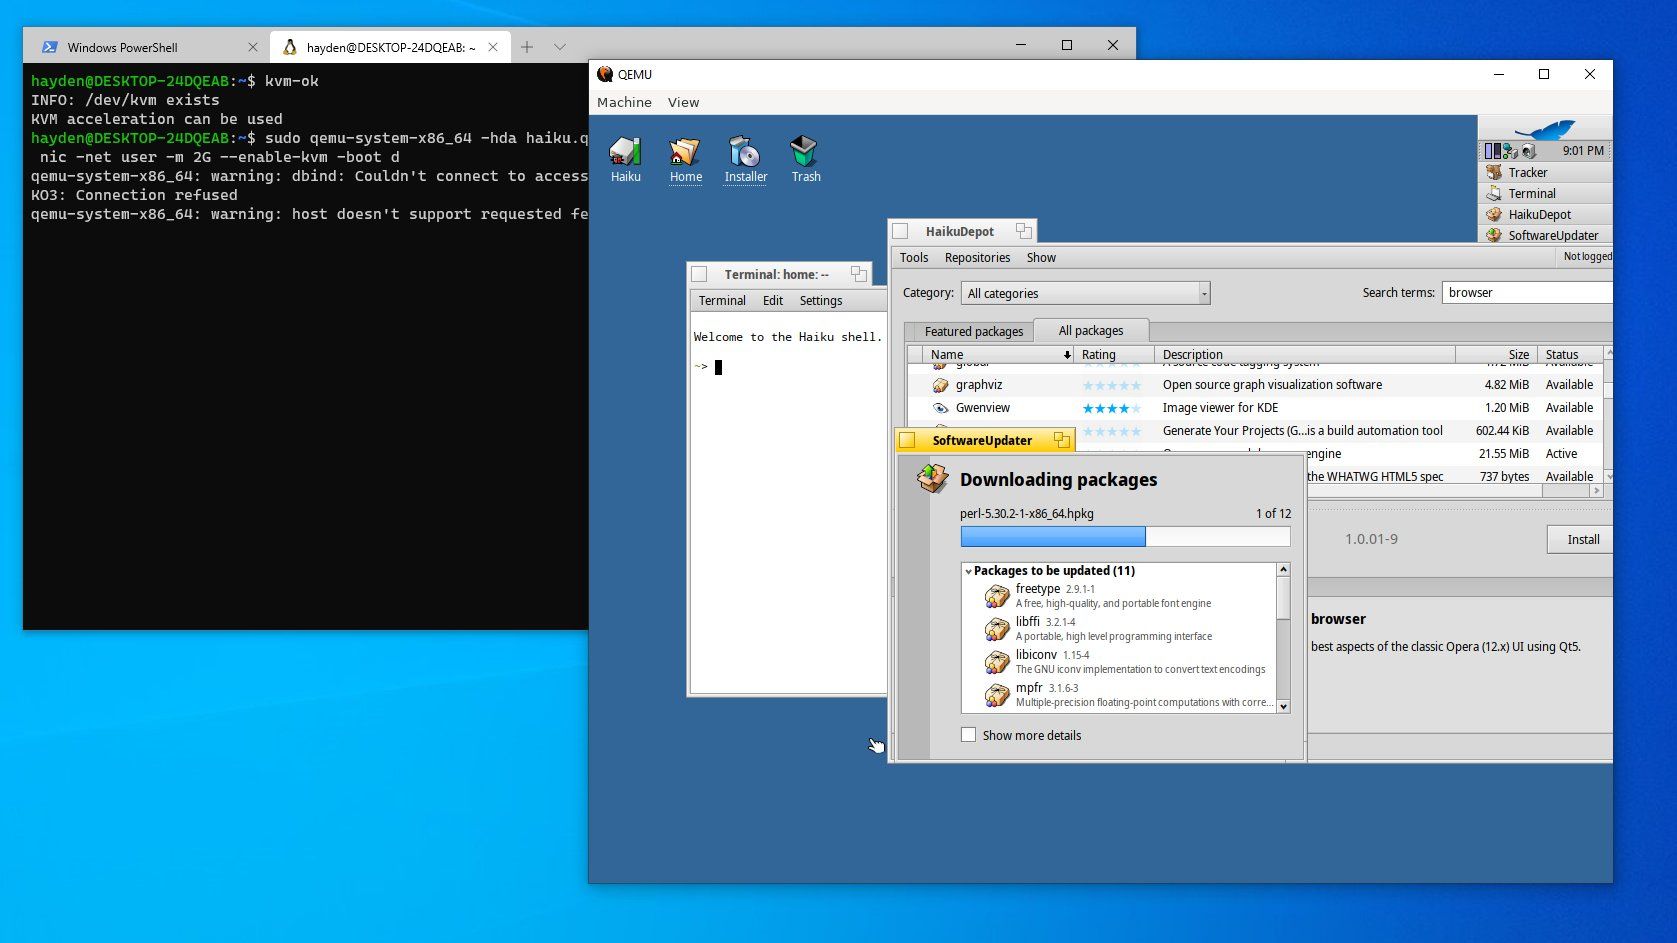
./boot_ubuntu_kvm.shOther Distros
You can create as many different qcow2 virtual hard drives as you have space for and install different distros on each. For other distros just create a new qcow2 file, download the bootable ISO (use aria again to speed it up, tip: aria works on .torrent files too!), mount both in your qemu options, and install onto the virtual hard drive.
Other Operating Systems
Haiku
- Download an ISO from the nightly images.
- Follow the approach used above.
macOS
- You must comply with the terms of the macOS EULA.
- Once the KVM configuration above is in place, this works quite well.
- In basic.sh usb-tablet works better than usb-mouse.
Additional Reading
 sirredbeard

Compiling Your Own Linux Kernel for Windows? WSL 2


